Getting Setup
What to bring
Bring your personal laptop and a power cord. This is going to be a hands-on workshop, meaning that you’ll be writing code and collaborating with new friends you’ll make at the workshop.
We’ll be using APIs from OpenAI and Anthropic, so you will need to create an account with each service and get an API key.
Head to OpenAI and Anthropic to create your accounts and get your API keys. Once you have your API keys, store them in the project folder in a file named .env:
.env
OPENAI_API_KEY=sk-proj-...
ANTHROPIC_API_KEY=sk-ant-...
If you’re using the exercises in this workshop, it’s unlikely that your API usage will exceed a few dollars. Alternatively, if you want to use or try local models (which are free) during the workshop, you should install ollama and download a model.
Create Accounts
In this workshop, we’ll be using a few different online services. If you don’t already have accounts with these services, you’ll need to create them before we get started.
- Discord
- Used to communicate during the workshop and ask questions via text. Also used for general online participation during the conference.
- Make sure your display name is the one you used to register for the conference.
- Join the
posit::conf(2025)Discord server via the posit::conf event portal. - Our workshop channel is
#workshop-llm.
- GitHub
- The workshop materials are hosted on GitHub and we may use GitHub in an activity during the workshop.
Choose your IDE
You can use any IDE you like to follow along with the workshop. We’ll be using Positron, the free, next-generation data science IDE from Posit.
Of course, you’re welcome to use RStudio, VS Code or any other IDE you prefer.
Using Positron offers you the opportunity to try out two new AI-powered features in Positron:
Positron Assistant, a general purpose AI assistant integrated directly into your development environment.
Databot, an AI assistant specifically designed to accelerate exploratory data analysis.
Prepping for the workshop
To prepare for the workshop, you need to clone the repository and install the necessary packages.
Clone the repository
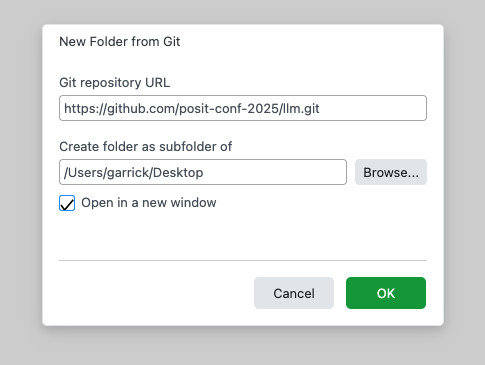
In Positron, use File > New Folder from Git…. Enter the repository link—https://github.com/posit-conf-2025/llm.git—and choose a location on your computer to save the project.
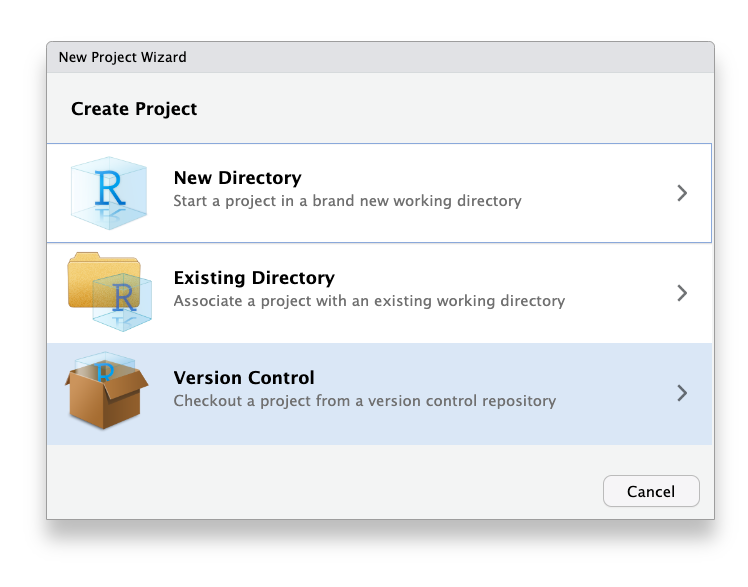
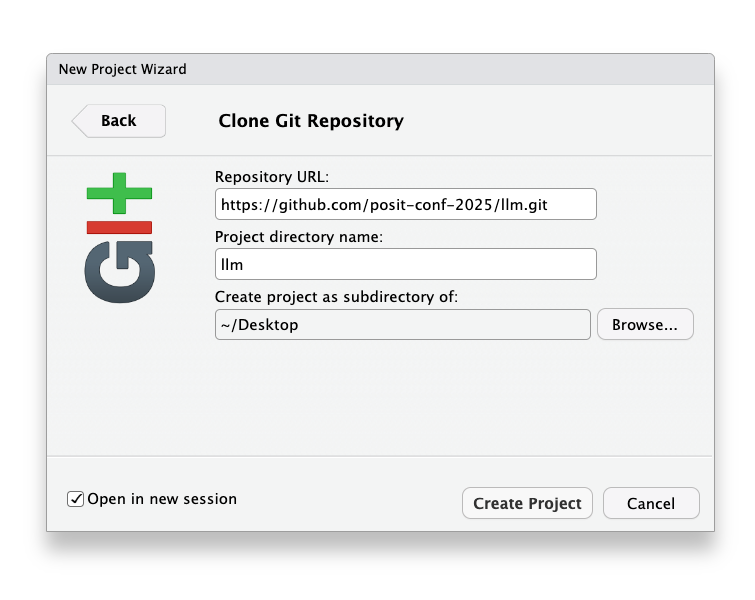
In RStudio, use the project dropdown menu (top right) or File > New Project…. Choose Version Control and then pick Git.
Enter the repository link—https://github.com/posit-conf-2025/llm.git—and choose a location on your computer to save the project.
In VS Code,
- open the command palette with
Ctrl+Shift+P(Windows/Linux) orCmd+Shift+P(Mac). - Type
Git: Cloneand select it. - Enter the repository link:
https://github.com/posit-conf-2025/llm.git - Choose a location on your computer to save the project.

You can use the usethis package to quickly clone the repository:
usethis::create_from_github(
  "posit-conf-2025/llm",
  # Decide where to put the project here:
  destdir = "~/Desktop/llm"
)
This will download the repository and open the project in RStudio.
cd ~/Desktop # or somewhere you can find easily

gh repo clone posit-conf-2025/llm
cd llm
cd ~/Desktop # or somewhere you can find easily
git clone https://github.com/posit-conf-2025/llm.git
cd llmSet up your environment
This workshop is designed so that you can use either R or Python. You can choose to use only one language throughout, or you can even switch between R and Python during the workshop!
Even if you’re only planning to use R, consider installing uv, a package and environment manager for Python (see the Python instructions below). That way, could easily try out the Python examples during the workshop if you want to.
First, make sure you’re using a recent version of R. I used R 4.5 but any recent version of R (>= 4.1) should work. I also use rig to manage my R installations, since it makes it easy to install new versions of R and switch between them.
Then, open the project in your IDE and run the following commands in the R console:
# Install pak if you don't have it already
# install.packages("pak")

# Add the Posit and RStudio R-Universe repos for easy dev package installation
pak::repo_add("https://posit-dev.r-universe.dev")
pak::repo_add("https://rstudio.r-universe.dev")

pak::local_install_deps()
Alternative: Direct package installation
# Install {pak} (it's fast and smart at installing packages)
if (!requireNamespace("pak", quietly = TRUE)) {
  # fmt: skip
  install.packages("pak", repos = sprintf("https://r-lib.github.io/p/pak/stable/%s/%s/%s", .Platform$pkgType, R.Version()$os, R.Version()$arch))
}

# Now install the packages we need for the workshop
pak::pak(c(
  "askpass",
  "base64enc",
  "beepr",
  "brio",
  "bsicons",
  "rstudio/bslib", # remove "rstudio/" to use bslib from CRAN
  "digest",
  "dotenv",
  "dplyr",
  "ellmer",
  "forcats",
  "fs",
  "ggplot2",
  "here",
  "leaflet",
  "magick",
  "mcptools",
  "purrr",
  "posit-dev/querychat/pkg-r",
  "ragnar",
  "reactable",
  "readr",
  "scales",
  "rstudio/shiny", # remove "rstudio/" to use shiny from CRAN
  "posit-dev/shinychat/pkg-r",
  "tidyr",
  "vitals",
  "watcher",
  "weathR"
))
We’re using uv by Astral to manage our Python environment and dependencies. If you don’t have uv installed, you can install it by following uv’s installation instructions.
Once you’re set up with uv, open the project in your IDE and run the following command in the terminal to create the Python environment and install the necessary packages:
uv syncThat command will create a virtual environment in the project directory and install all the required packages listed in the pyproject.toml file.
Local models with ollama
ollama is an open-source tool for running LLMs locally on your computer. Local models do not provide the same quality of responses as flagship models from AI providers like OpenAI or Anthropic, but you can run models on your own computer without having to pay for API access or sending your data to a third party.
You do not need to install ollama or use local models to participate in the workshop. That said, they’re a fun way to experiment with LLMs without incurring API costs.
To use ollama, first download and install it on your computer. Then, you can browse the list of models on the ollama website to find a model that you want to use. Here are a few that we like for local testing. For the workshop, I’d recommend installing gemma3:4b1.
| ID | Size | Capabilities |
|---|---|---|
| [gemma3:4b][ollama-gemma3-4b] | 3.3GB | vision |
| [qwen3:8b][ollama-qwen3-8b] | 5.2GB | tools thinking |
| [gpt-oss:20b][ollama-gpt-oss] | 14GB | tools thinking |
To use a model, you first need to download it. For example, to download [gemma3:4b][ollama-gemma3-4b], run the following command in your terminal:
ollama pull gemma3:4bThat command downloads the model to your computer. Once the model is downloaded, you can use it on your own computer without needing to be connected to the internet.
You can use ollama to chat with the model directly in your terminal
ollama run gemma3:4bor you can use ellmer or chatlas to interact with the model from R or Python.
library(ellmer)

chat <- chat_ollama(model = "gemma3:4b")
chat$chat("What is the capital of France?")
The capital of France is Paris.
It’s a global center for art, fashion, gastronomy, and culture. 🌍🇫🇷
from chatlas import ChatOllama

chat = ChatOllama(model="gemma3:4b")
chat.chat("What is the capital of France?")
The capital of France is Paris.
It’s a global center for art, fashion, gastronomy, and culture. 😊
Do you want to know anything more about Paris?
Local models are just like the famous ChatGPT or Claude models, but they run entirely on your own computer. You can use them for all of the same tasks: conversational AI, code generation, text processing, vision and more. There are a wide range of models available at many different sizes and capabilities, so you can choose one that fits your hardware and performance needs.
Local models are no where near as capable as the flagship models from OpenAI or Anthropic. Still, there are a few reasons you might want to use a local model:
- Your conversation never leaves your computer, ensuring complete data privacy.
- No API costs, making local models very low-cost (other than the cost of your laptop or the hardware to run the model).
- They work offline, so you can use them without an internet connection.
Local models are a great option for prototyping, experimentation, and personal use. They’re also useful to companies that want to use LLMs but have strict data privacy requirements and need to ensure that their data never leaves their network.
On the other hand, because you’re running the model on your own hardware, local models are slower and less powerful than cloud-based models, especially if you’re using a laptop or desktop computer. Personally, I use local models for experiments and testing to avoid API charges and switch to cloud-based models when I’m putting an LLM-powered application into production.
The night before the workshop
If you’ve followed the instructions above, you should be all set for the workshop! But we’ll likely be making some last-minute changes to the workshop materials as we get closer to the event.
To be completely ready-to-go on the day of the workshop, make sure that you get the latest version of the materials the night before the workshop.
Update your local copy of the repository:
Use
git pullin the terminal, or the Git: Pull command in your IDE.Update your R packages:
If you’re using R, run
renv::restore()again to make sure you have the latest package versions.Update your Python packages:
If you’re using Python, run
uv syncagain to make sure you have the latest package versions.
Footnotes
The best open-weights model you can run on a typical laptop (with 16GB of RAM and a decent processor, like an M1 Mac) is [gpt-oss:20b][ollama-gpt-oss]. For something a little bit smaller, try [qwen3:8b][ollama-qwen3-8b].↩︎